
The basics of an aeration system:
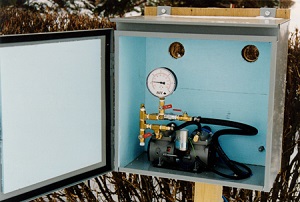
B: Installation of compressor in house
Description of the above image.
Illustration of a dugout filled with water; a compressor at the edge of the dugout (A), and a home (B) with a sketch of a compressor in the basement. The air line is 2.5 meters deep, below the frost line. The distance between the compressor and the home is up to a ½ mile. The air diffuser is placed on the bottom of the dugout, after the check valve. Both are submerged below water. Bubbles are shown coming out of the air diffuser.
Compressors
Small diaphragm compressors work best for dugout aeration because they perform well at the pressure ranges (up to 103 to 138 kilopascals (kPa)) needed to aerate dugouts. An air compressor of ¼ to 1/8 horsepower (hp) putting out about one cubic foot per minute (cfm) is sufficient to aerate a dugout up to five million litres. These compressors, which have a low power demand (100-200 watts), should run continuously.
If power is available, the compressor can be located in a box or an unheated building on the edge of the dugout. Some protection from the weather and dust should be provided if the compressor is outdoors.
If power is not available at or near the dugout the compressor can be located up to 800 metres (m) from the dugout and the air carried to the dugout through ½ inch plastic pipe. It can also be in the basement of the house if an air line was installed along with the water line.
If the compressor is in a heated building, then some precautions should be taken to avoid condensation in the air line during the winter. Air pressure in the line will increase as condensation occurs and eventually ice can block the air line. This problem can be avoided by having a condensation tank outside the heated building.
Condensation is not a problem if the compressor is in the house and the air line is buried below the frost line. The air line should have at least one check valve because basements are often at or below the water level in the dugout.
The compressor should have a pressure release valve with a release pressure of around 103 kPa to vent air from the system and prevent damage to the compressor and air line in case the air line becomes blocked. A pressure gauge should also be located on the outlet line to monitor pressure. It should be isolated from the air line with a valve so that it will not wear out rapidly because of fluctuating pressure near the pump.
Gauges and valves
Pressure relief valve
In the event of line blockage, usually due to ice, the pressure relief valve will release at the set pressure and protect the compressor from damage. Most are not designed to run continuously over 138 kPa, although they will operate up to and above 414 kPa.
The pressure relief valve should be adjustable in the ranges of 0-172 kPa and be set to about 124 kPa. In the event of line blockage, usually due to ice, the peak inverse voltage (PRV) will release at the set pressure and protect the compressor from damage.
Bleeder valve
Some compressors use low torque motors. This increases efficiency but creates starting problems under load. In other words, the compressor will not start with back pressures of 13.80 kPa or greater.
During power outages, this can cause problems. If the system is tight and operating at 69 kPa, a quick "power off - power on" requires the compressor to start at 69 kPa back pressure. Generally, the compressor will try to start until it overheats throwing the thermal protection switch.
Repeated starting cycles at high ambient air temperatures in conjunction with the already high compressor operating temperatures will eventually damage the motor. The bleeder valve is set to a small controlled leak or "bleed" of about three to five per cent loss. This allows the assembly to bleed off pressure from the check valve upstream to the bleeder valve in about three seconds allowing the compressors to start safely.
If you're using a ball valve as a bleeder, then the check valve at the assembly is required to limit the actual air volume the bleeder must release during a "power-off". Without this check valve, the bleeder has to empty the entire supply line's excess pressure volume. In short "power on-offs", this will not be possible resulting in the bleeder becoming ineffective.
There are other solutions to this problem. A "normally open" solenoid valve also works well with the advantage being no pressure loss during operation. However, at a cost of about $120.00, this option is more expensive.
Pressure relief valves and check valves are not always easy to find locally. Be careful when purchasing valves because aeration systems operate at low pressure and need valves designed to operate with minimum pressure loss. Any valve used in these systems should have an associated pressure loss of no more than 6.90 kPa at operating pressure.
Many distributors are not accustomed to dealing with systems operating at low pressure.
Shutoff valve
The shut-off valve allows the setting of the pressure release valve and the bleeder valve. It also acts as a manual check valve.
Fittings
Brass air fittings should be available from local suppliers. Use ¼ inch extruded or forged air fittings. Brass plumbing-type fittings are not recommended, as they are prone to splitting when over-tightened and are easily damaged from internal water freezing. In addition, extruded fittings are much easier to work with as pipe wrenches are not required.
Pressure gage
Without a pressure gauge there is no accurate way of monitoring the system's operation. It is possible to become familiar with a system by regularly monitoring its pressure. In addition, the pressure gauge is required to accurately set both the pressure release valve and the bleeder valve.
Header tank
Gauges require header tanks. Pulsating air from the compressor will damage the gauge quickly if not dampened. Liquid-filled gauges may be more tolerant of pulsation but not immune.
Header tanks allow for the use of inexpensive dry gauges by dampening the pulsation, which protects the gauge. Small compressors create a vibration, which can also damage gauges. Mounting the header tank away from the compressor and connecting it with a rubber air line will solve this problem. Use 0-30 pounds per square inch (psi) gauges which will allow for accurate reading even with small-faced gauges.
Diffuser
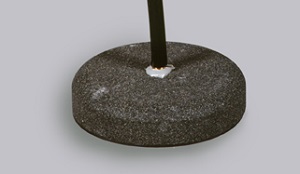
An air stone diffuser with an attached air line
A diffuser dramatically increases the effectiveness of any aeration system. Research shows that oxygen levels in dugouts aerated with a diffuser are twice as high as those in dugouts aerated without a diffuser.
Diffusers produce small bubbles which increase diffusion of oxygen from the air into the water. More importantly, the rising bubbles circulate the water in the dugout. The smaller the bubbles, the more efficient they are at both oxygen diffusion and circulating the water.
There are three basic types of diffusers which work well for dugout aeration: air stones, linear diffusers and membrane diffusers.
Air stones are the most readily available type of diffuser. It is important to obtain an air stone designed specifically for dugout aeration. The size of the air stone must be matched to the volume of air being pumped.

A membrane diffuser with an attached air line
Linear diffusers are the most efficient type of diffuser. Two types exist. One is made of ½ inch (1.27 cm) diameter plastic tubing with ¼ inch (.64 cm) slits every 7.6 to 10.2 cm along the tubing with a plastic coating lead keel to weigh it down.
The other type of linear diffuser is made of two attached rubber tubes, the top tube (¾ inch outside diameter) has very small puncture holes every ½ inch and the second tube (1 inch outside diameter) is filled with sand to act as a keel.
Membrane diffusers are made from rubber tubing which has fine slits in it. They produce fine bubbles and require low maintenance as the rubber will stretch and self clean when deposits form around the slits. Membrane diffusers have the lowest maintenance requirements.
While a diffuser may temporarily stir up some sediment, aeration will occur only to the depth at which the diffuser is located. Placing the diffuser on the bottom of the dugout at its deepest point produces the best aeration and the highest quality water.
The diffuser need not be located near the intake. If the aeration system is working properly, the water in the dugout will be well mixed and uniform in quality. So the placement of the diffuser relative to the water intake is not important in an aerated dugout.
Air line
The most common form of air line used for dugout aeration is ½ inch black plastic pipe. It is readily available and inexpensive but it is thin-walled and easily damaged. Bury it so that it is not accidentally damaged. If it is to remain on the surface, it is best to use a line that is not easily damaged, such as rubber line used on shop air compressors.
A spring-loaded check valve should be installed with an opening pressure of 13.79 kPa or less on the air line near the diffuser. This prevents water from coming up the line and freezing if the compressor stops in winter.
If, for reasons of safety, two check valves are installed (one near the diffuser and one near the compressor), then one should be aware that the opening pressures are additive (two valves with an opening pressure of 13.79 kPa would add 27.58 kPa to the back pressure on the compressor). This would significantly increase operating cost and also wear on the compressor.